
Spring Cloud에 대한 설정을 어느정도 마쳤다.
이제 각 서비스들 간의 통신 환경을 구축해보려고 한다.
0. WebClient
Spring Boot에서는 여러 HTTP 통신 라이브러리가 있다.
내가 옛날에 많이 봤던 클래스는 RestTemplate이었다.
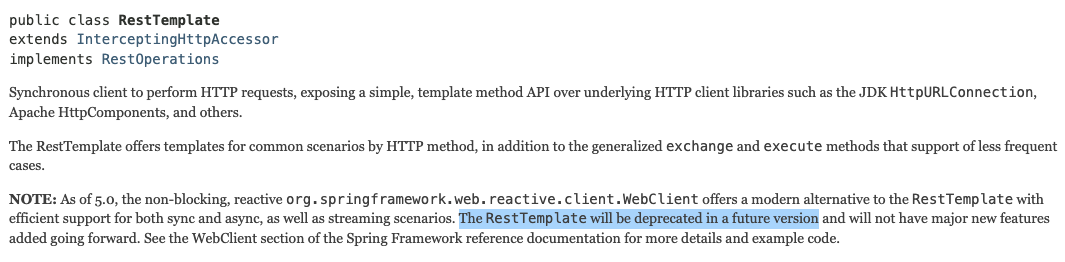
Spring Doc에서도 WebClient를 사용하는 것을 권고하고 있고, RestTemplate보다 더 많은 기능을 제공하기 때문에 WebClient로 진행해보려고 한다.
1. 동기 vs 비동기 / Blocking vs Non-Blocking
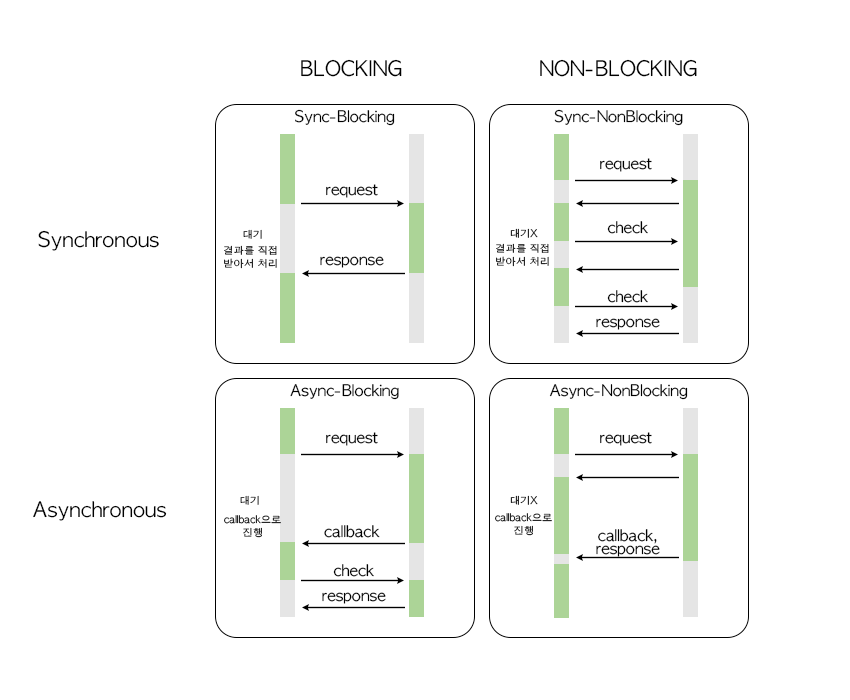
먼저 동기와 비동기를 구분해보자.
- 동기(Synchronous) : 요청 후 결과를 반환할 때 까지 기다림
- 비동기(Asynchronous) : 요청 후 결과를 반환할 때 까지 기다리지 않음
그렇다면, Blocking과 Non-Blocking를 구분해보자.
- Blocking : 요청 후 작업이 끝났는지 지속적으로 확인함, 결과를 직접 받아서 처리
- Non-Blocking : callback 함수를 미리 지정해두고, callback을 받을 시 진행함
이제 4가지 종류를 구분해보자.
- Sync-Blocking : 요청 후 결과를 반환할때 까지 기다리고, 결과를 받고 실행.
가장 일반적인 Request의 종류라고 할 수 있겠다.
- Async-Blocking : 요청 후 callback함수를 받을때까지 대기, callback을 받고 요청을 보내 response를 받음
비동기의 특징이 없는 요청이다. 거의 사용하지 않는다.
- Sync-NonBlocking : 요청 후 결과를 바로 받지 않고 다른 일을 진행, 결과를 반환할때까지 주기적으로 검사함.
비동기의 특징으로 다른 작업을 동시에 할 수 있지만, 주기적으로 검사해야 한다.
- Async-NonBlocking : 요청 후 결과를 바로 받지 않고 다른 일을 진행, callback시 함수를 지정해둠.
비동기의 특징을 가장 잘 살릴 수 있는 요청이다.
2. Request
WebClient는 앞서 설명했던 Blocking과 Non-Blocking을 모두 지원하는 클라이언트이다.
WebClient는 WebFlux를 의존성 추가 해줌으로써 사용할 수 있다.
dependencies {

    implementation 'org.springframework.boot:spring-boot-starter-webflux'

}
현재 내 프로젝트에서는, 사용자가 app-service를 통해 자신의 앱을 등록할 때, 데이터베이스에 사용자의 이름을 같이 넣으려고 한다.
app-service로부터 user-service로 통신을 통해 사용자의 정보를 가져와야 한다.
2-1. create
단순하게 create메서드를 통해 요청할 수 있다.
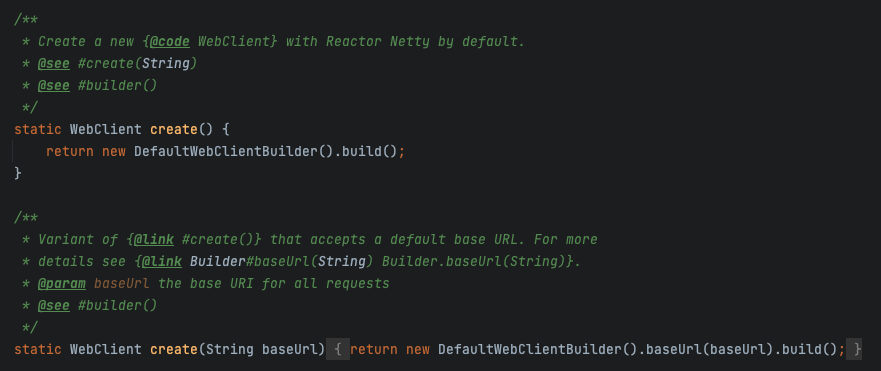
create는 static 함수이며, 클래스에서 직접 메서드를 호출하여 생성할 수 있다.
파라미터로 url을 전달하여 시작할 수도 있고, 단순 create를 시작으로 요청을 빌드할 수 있다.
Mono<UserResponseDto> userResponseDtoMono =
        WebClient.create("http://localhost:9000/user/" + appRequestDto.getUserId())
        .get()// GET METHOD
        .retrieve().bodyToMono(UserResponseDto.class);

userResponseDtoMono.subscribe(userResponseDto -> app.setUserName(userResponseDto.getName()));
subscribe는 위에서 설명했던 callback이라고 보면 될 것 같다.
뒤에서 더 다룰 것이다.
POST 요청은 body 메서드에 담아서 보내면 된다.
Mono<UserResponseDto> userResponseDtoMono1 =
                WebClient.create("http://localhost:9000/user/" + appRequestDto.getUserId())
                .post()// POST METHOD
                .body(Mono.just(appRequestDto), AppRequestDto.class)
                .retrieve()
//               .bodyToMono(Void.class) // Response 내용 없을 시
                .bodyToMono(UserResponseDto.class);

        userResponseDtoMono.subscribe(userResponseDto -> app.setUserName(userResponseDto.getName()));
2-2. build
요청을 세세하게 빌드하여 미리 client를 구축할 수도 있다.
builder를 이용하면 DefaultWebClientBuilder를 반환하게 되는데, 메서드는 다음과 같다.
interface Builder {

		Builder baseUrl(String baseUrl);
		Builder defaultUriVariables(Map<String, ?> defaultUriVariables);
		Builder uriBuilderFactory(UriBuilderFactory uriBuilderFactory);
		Builder defaultHeader(String header, String... values);
		Builder defaultHeaders(Consumer<HttpHeaders> headersConsumer);
		Builder defaultCookie(String cookie, String... values);
		Builder defaultCookies(Consumer<MultiValueMap<String, String>> cookiesConsumer);
		Builder defaultRequest(Consumer<RequestHeadersSpec<?>> defaultRequest);
		Builder defaultStatusHandler(Predicate<HttpStatusCode> statusPredicate,
				Function<ClientResponse, Mono<? extends Throwable>> exceptionFunction);
		Builder filter(ExchangeFilterFunction filter);
		Builder filters(Consumer<List<ExchangeFilterFunction>> filtersConsumer);
		Builder clientConnector(ClientHttpConnector connector);
		Builder codecs(Consumer<ClientCodecConfigurer> configurer);
		Builder exchangeStrategies(ExchangeStrategies strategies);
		Builder exchangeFunction(ExchangeFunction exchangeFunction);
		Builder observationRegistry(ObservationRegistry observationRegistry);
		Builder observationConvention(ClientRequestObservationConvention observationConvention);
		Builder apply(Consumer<Builder> builderConsumer);
		Builder clone();
		WebClient build();
	}
baseUrl을 설정하거나, 헤더나 쿠키를 설정할 수도 있다.
중간에 predicate 등을 이용한 필터를 적용할 수도 있겠다.
WebClient client = WebClient.builder()
        .baseUrl("http://localhost:9000/user/" + appRequestDto.getUserId())
        .build();

Mono<UserResponseDto> userResponseDtoMono2 =
        client.get()// GET METHOD
                .retrieve().bodyToMono(UserResponseDto.class);
미리 Webclient를 구축해놓지 않았다면, builder로 세세하게 설정하여 보내면 되겠다.
3. Response
그렇다면, Response를 받고 처리하는 과정을 살펴보자.
다음 ReponseSpec 인터페이스를 살펴보자.
interface ResponseSpec {

   ResponseSpec onStatus(Predicate<HttpStatusCode> statusPredicate,
         Function<ClientResponse, Mono<? extends Throwable>> exceptionFunction);

   ResponseSpec onRawStatus(IntPredicate statusCodePredicate,
         Function<ClientResponse, Mono<? extends Throwable>> exceptionFunction);

   <T> Mono<T> bodyToMono(Class<T> elementClass);

   <T> Mono<T> bodyToMono(ParameterizedTypeReference<T> elementTypeRef);

   <T> Flux<T> bodyToFlux(Class<T> elementClass);

   <T> Flux<T> bodyToFlux(ParameterizedTypeReference<T> elementTypeRef);

   <T> Mono<ResponseEntity<T>> toEntity(Class<T> bodyClass);

   <T> Mono<ResponseEntity<T>> toEntity(ParameterizedTypeReference<T> bodyTypeReference);

   <T> Mono<ResponseEntity<List<T>>> toEntityList(Class<T> elementClass);

   <T> Mono<ResponseEntity<List<T>>> toEntityList(ParameterizedTypeReference<T> elementTypeRef);

   <T> Mono<ResponseEntity<Flux<T>>> toEntityFlux(Class<T> elementType);

   <T> Mono<ResponseEntity<Flux<T>>> toEntityFlux(ParameterizedTypeReference<T> elementTypeReference);

   <T> Mono<ResponseEntity<Flux<T>>> toEntityFlux(BodyExtractor<Flux<T>, ? super ClientHttpResponse> bodyExtractor);

   Mono<ResponseEntity<Void>> toBodilessEntity();
}
3-1. 추출
중간에 retrieve()를 볼 수 있는데,
retrieve의 설명으로는 "Proceed to declare how to extract the response" 으로 나와있다.
즉, 간단하게 Response를 받아 Body를 추출하는 메서드이다.
4XX나 5XX Response는 WebClientResponseException이 일어나며, 이를 핸들링 하려면 onStatus 핸들러를 따로 사용해야 한다.
만약 Body 값 이외에 다른 세세한 값들을 컨트롤하고 싶다면, exchangeToXXX 를 사용해야 한다.
아래는 exchangeToMono를 사용한 예시이다.
Mono<Person> entityMono = client.get()
      .uri("/persons/1")
      .accept(MediaType.APPLICATION_JSON)
      .exchangeToMono(response -> {
          if (response.statusCode().equals(HttpStatus.OK)) {
              return response.bodyToMono(Person.class);
          }
          else {
              return response.createError();
          }
      });
3-2. 변환
retrieve()를 하고 나서 다음 메서드들이다.
크게 Mono 또는 Flux로 받을 수 있다. WebFlux에서 사용하는 리액티브 타입으로,
Mono는 0 또는 하나의 데이터와 에러, Flux는 0 또는 하나 이상의 데이터와 에러를 갖는다. 자세한 내용은 설명하지 않겠다.
subscribe 메서드를 통해 리액티브 타입을 전달받을 수 있다.
Mono<T> bodyToMono(Class<T> elementClass);

Mono<T> bodyToMono(ParameterizedTypeReference<T> elementTypeRef);
bodyToMono 또는 bodyToFlux를 사용하고, 파라미터로 Response를 받을 클래스를 넘겨주면 된다.
3-2-1. toEntity()
Mono<ResponseEntity<T>> toEntity(ParameterizedTypeReference<T> bodyTypeReference);

Mono<ResponseEntity<List<T>>> toEntityList(Class<T> elementClass);

Mono<ResponseEntity<List<T>>> toEntityList(ParameterizedTypeReference<T> elementTypeRef);

Mono<ResponseEntity<Flux<T>>> toEntityFlux(Class<T> elementType);

Mono<ResponseEntity<Flux<T>>> toEntityFlux(ParameterizedTypeReference<T> elementTypeReference);

Mono<ResponseEntity<Flux<T>>> toEntityFlux(BodyExtractor<Flux<T>, ? super ClientHttpResponse> bodyExtractor);

Mono<ResponseEntity<Void>> toBodilessEntity();
기본적으로 toEntity를 사용하면 ResponseEntity 객체가 반환된다.
대체로 body 내에 들어갈 클래스를 인자로 전달해주면 되고, Body가 없다면 toBodilessEntity()를 사용하면 된다.
3-2-2. bodyToMono(), bodyToFlux()
Mono<T> bodyToMono(Class<T> elementClass);

Mono<T> bodyToMono(ParameterizedTypeReference<T> elementTypeRef);

Flux<T> bodyToFlux(Class<T> elementClass);

Flux<T> bodyToFlux(ParameterizedTypeReference<T> elementTypeRef);
Mono 또는 Flux 타입으로 받을 수 있다. 보통 body값만 필요할 때 사용하며, 어떤 객체가 들어갈지 인자로 전달하면 된다.
3-3-3.exchangeToXXX
<V> Mono<V> exchangeToMono(Function<ClientResponse, ? extends Mono<V>> responseHandler);

<V> Flux<V> exchangeToFlux(Function<ClientResponse, ? extends Flux<V>> responseHandler);
retrieve 전에 exchange하여 바로 반환받을 수 있다. Handler를 이용하여 세세하게 컨트롤할 수 있지만, retrieve를 권고하는 편이다.
이제 Response로 Mono, Flux 타입을 받았다면, 다음과 같이 사용할 수 있다.
- .block() 메서드를 사용하여 Blocking 방식으로 처리한다.
- .subscribe() 메서드를 사용하여 Non-Blocking 방식으로 callback 함수를 등록해둔다.
4. Settings
이제 Request와 Response를 살펴보았다. 각각 세부 세팅들을 하는 방법들을 알아보겠다.
4-1. Error Handling
Mono<UserResponseDto> userResponseDtoMono =
        WebClient.create("http://localhost:9000/user/" + appRequestDto.getUserId())
            .get()
            .retrieve()
	    .onStatus(HttpStatusCode::is4xxClientError, clientResponse -> Mono.error(ClientAbortException::new))
            .onStatus(HttpStatusCode::is5xxServerError, clientResponse -> Mono.error(InternalServerErrorException::new))
            .bodyToMono(UserResponseDto.class);
retrieve 후에, 앞에서 언급했던 onStatus 메서드를 사용하여 status에 따라 Exception을 처리해주면 되겠다.
만약 exchaneToXXX를 사용하는 경우,
WebClient.create("http://localhost:9000/user/" + appRequestDto.getUserId())
        .post()// POST METHOD
        .body(Mono.just(appRequestDto), AppRequestDto.class)
        .exchangeToMono(clientResponse -> {
            if (clientResponse.statusCode().equals(HttpStatus.OK)) {
                return clientResponse.bodyToMono(UserResponseDto.class);
            } else if (clientResponse.statusCode().is4xxClientError()) {
                throw new RuntimeException();
            } else if (clientResponse.statusCode().is5xxServerError()) {
                throw new RuntimeException();
            } else throw new RuntimeException();

        });
statusCode를 비교하여 원하는 Exception을 넘겨주면 되겠다.
4-2 Connection 설정
서비스에서 다루는 WebClient에 대한 기본적인 설정들을 등록해둘 수 있다.
@Configuration
public class WebClientConfig {

    HttpClient httpClient = HttpClient.create()
            .option(ChannelOption.CONNECT_TIMEOUT_MILLIS, 10000); // 10초


    @Bean
    public WebClient webClient() {
        return WebClient.builder()
                .defaultCookie("Default-Cookie", "value")
                .defaultHeader("Default-Header", "header")
                .clientConnector(new ReactorClientHttpConnector(httpClient))
                .build();
    }

    public ConnectionProvider connectionProvider() {
        return ConnectionProvider.builder("http")
                .maxConnections(50) // Connection Pool 개수
                .pendingAcquireTimeout(Duration.ofMillis(0)) // Connection 을 얻기 위해 기다리는 최대 시간
                .pendingAcquireMaxCount(-1) // Connection을 가져오는 시도 횟수, -1은 제한 없
                .maxIdleTime(Duration.ofMillis(1000L)) // idle 상태의 커넥션을 유지하는 시간
                .build();

    }
}
설정들에 대한 내용은 길어져서 다음에 더 정확하게 다루도록 하겠다.
'BackEnd > Spring Cloud' 카테고리의 다른 글
| [ Spring Cloud ] Microservice들 간의 통신 구축하기 (2) - Kafka (0) | 2024.02.18 |
|---|---|
| [Spring Cloud] Spring Cloud Config Server 설정값을 Private Repository 에서 가져오기 (0) | 2024.02.12 |
| [Spring Cloud] Spring Cloud Bus (0) | 2024.02.05 |
| [Spring Cloud] Actuator를 이용한 Config Server 기동 (0) | 2024.01.29 |
| [Spring Cloud] API Gateway, Filter (1) | 2024.01.08 |